Showing posts with label free tutorial. Show all posts

Friday, 14 April 2017

Easter Egg Decorating


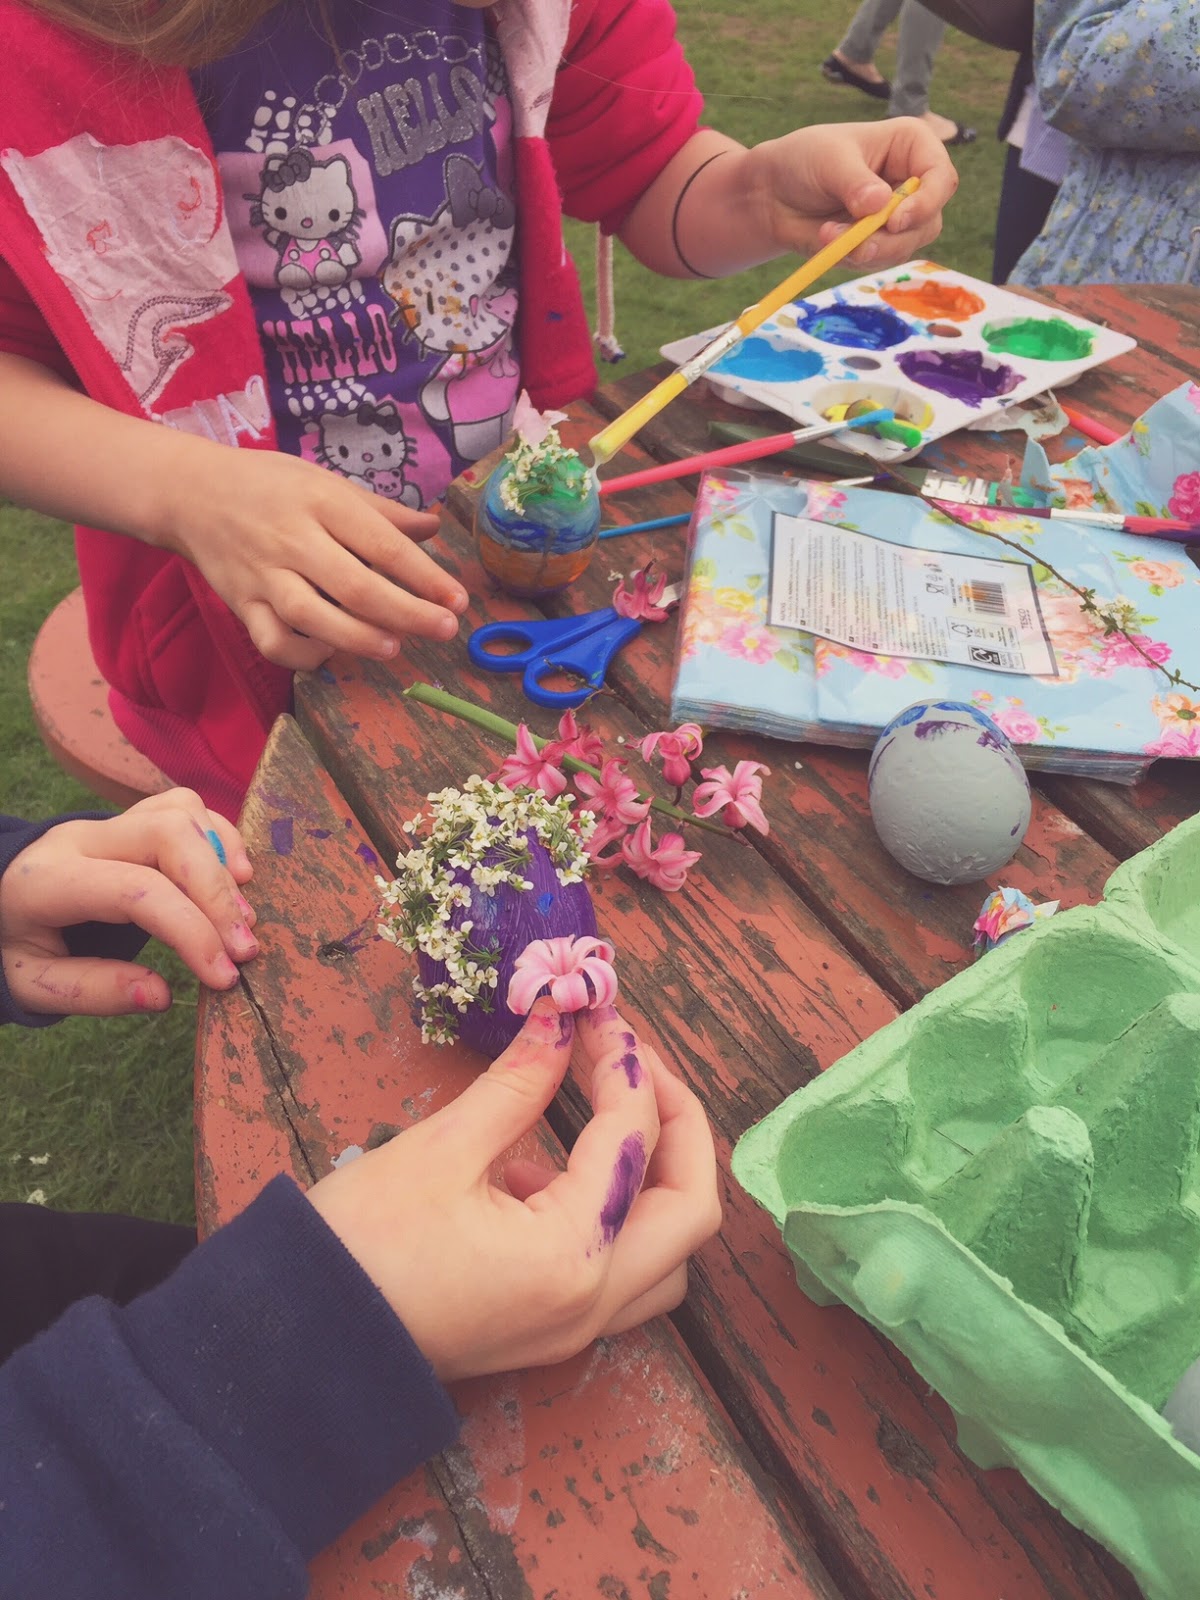
This Easter holidays I helped run a craft workshop for children with our local creative group the Neotists. The children made nests from found twigs and materials and painted and decorated Easter eggs. It was great fun and if you are at a loss for activities for your children this Easter weekend, then it is so simple, so here are some tips to give it a go!


To make the nests, we used very bendy green twigs - willow is a perfect choice. We started with three twigs arranged in six pronged 'star' and bound them in the centre with string or yarn. Then we proceeded to weave twigs, grass, straw and yarn in and out of this formation from the centre out. Now time to fill the nest.


We used polystyrene eggs, but you could just as easily use hard boiled hens eggs. Some of the younger children simply painted their eggs in bright colours, which looked fab. But we also laid out pretty floral paper napkins, leaves and foliage so some children could stick these on. If you want to play with decoupaging your eggs, simply water down some PVA glue slightly, then paint a layer of this onto your egg.

Now lay on the leaves, petals or paper napkins (make sure you take off the second, bottom layer of tissue from the napkin first to make it easier to stick down) then apply more glue over the top.


Some of the children cut out some of the motifs from the napkins first to create patterns, however you can cover the whole egg in one napkin, trimming off the excess as you go. You could also use coloured tissue paper to cut out shapes, or other decorative papers, but the thinner the paper the better as it will adhere much more easily.


This was all great fun, but if you want a slightly less messy activity this Easter, there is also always my cute knitting egg cosy pattern which you can find free here!

Happy Easter!


Friday, 2 December 2016

Free Christmas Star Pattern!


In the Christmassy spirit of Advent, today I have written up a little pattern to share with you, using the very lovely Paintbox Yarns Simply DK. It is a very quick and simple pattern but includes a spike stitch and both working in the round and straight so I will knock up some accompanying tutorials for you as soon as I can. I will also publish a PDF version on Lovecrochet.com very soon.
I hope you enjoy making it, please do share your pictures of your own stars, can't wait to see which palette you choose!
 

Materials


Paintbox Yarns Simply DK 100% acrylic, 100g/276m/302yds 

Yarn A: Neon Pink, 156 x 1 ball

Yarn B: Buttercup Yellow, 122, x 1 ball

Yarn C: Rich Mauve, 144 x 1 ball

Yarn D: Rose Red, 113 x 1 ball

Yarn E: Washed Teal, 132 x 1 ball

Yarn F: Lime Green, 128 x 1 ball

4mm hook

Yarn needle

Toy Stuffing.


Tension

Exact tension is not essential.


Pattern Notes

Centre of the star is worked in the round. Points of the star are worked one by one on Round 6, but are worked back and forth, breaking the yarn after every point and rejoining the yarn to Round 5 to begin the next point.


Special Stitches

Cluster (cl): [yoh, insert in st, draw lp through] twice, 5 lps on hook, yoh and draw through all 5lps.


Method

Star (make two)

With 4mm hook and Yarn A make an adjustable ring. 

Rnd 1: 6dc in adjustable ring, pull tightly to close ring, sl st to first dc to close rnd – 6dc.

Fasten off Yarn A, join Yarn B to any st around with a sl st.

Rnd 2: 2ch, yoh, insert hook in same st, draw lp through, yoh and draw through all lps on hook, 1ch, (cl, 1ch) in each rem dc around, join rnd with sl st – 6 cl and 6 ch-sps.

Fasten off Yarn B, join Yarn C to any 1ch-sp around with a sl st.

Rnd 3: 2ch (counts as 1htr), 2htr in same ch-sp, 1ch, (3htr, 1ch) in each rem ch-sp around – 18htr, 6ch-sps.

Fasten off Yarn C, join Yarn D to first htr of any 3htr group with a sl st.

Rnd 4: 1dc in same st and in each of next 2 htr, insert hook down into cl from Row 2, yoh, draw loop through st and up to the height of current rnd, yoh and draw through 2lps on hook, spike made, *1dc in each of next 3 htr, spike stitch; rep from * 5 times in total, join rnd with sl st – 18dc and 6 spike sts.

Fasten off Yarn D, join Yarn E to any st around with a sl st.

Rnd 5: 1dc in each st around – 24dc.

Fasten off Yarn E, join Yarn F to any st around with a sl st.

Round 6 will be making the star points one by one as follows:

Star point:

Row 1: 1dc in this and each of next 4 sts, turn – 5dc.

Row 2: 1ch (does not count as st), 1dc in each st across – 5dc.

Row 3: 1ch (does not count as st), dc2tog, 1dc, dc2tog – 3dc.

Row 4: 1ch (does not count as st), 1dc in each st across – 3dc.

Row 5: 1ch (does not count as st), dc3tog – 3dc.

Fasten off yarn.

With RSF, rejoin yarn to same st of Rnd 5 that the last dc of Point One’s Row 1 is worked into, so this stitch of Rnd 5 will be worked into twice. Now work next point and each following point from Row 1 in the same way as the last, starting each following point in the last dc of the previous point’s Row 1.

6 points in total.


Finishing

Block pieces lightly to shape. Place two star pieces together with wrong sides facing.

Rejoin Yarn F to the top of any point and work evenly around the whole star in dc, working each dc through both layers of the star to join them. Before you reach the end of the round, stuff the star lightly to desired shape, then complete the round and join with a sl st to the first dc. Make 15ch, then sl st back down into bottom of the chain to make a hanging loop.
Hang on your tree and admire!


Saturday, 14 February 2015

i heart you...


Ok, so I am not really that big on Valentines day. 
I don't usually buy the old man anything as I am a little cynical about the commercial side of it, but when I have presented him with a token of my affection on the 14th February, it has got to be handmade, no overpriced stuff from the shops. 
And it is usually heart shaped. 
There have been many gifted items in assorted shapes and sizes over the years, received with varying degrees of enthusiasm, but all stored fondly since nonetheless.
So, this is my favourite, simple heart pattern, which I find sits satisfyingly in the hand as a stress reliever or comforter. Alternatively it can be made easily into a charm or keyring or other form of decoration. 
The best thing about it is that if you forgot to buy your loved ones something, you can knock this up in no time this morning before they wake up! Go on, you know you want to! 


Materials
Use any scraps of yarn with corresponding needle size. 
Small amount of toy stuffing.
Yarn needle.

Exact tension not essential but ensure you knit tightly to conceal the stuffing.

With 4mm hook, cast on 3 sts
Row 1: Purl
Row 2: Inc, knit to last st, inc – 5sts.
Rep last two rows until there are 15 sts.
Work 4 rows straight in stocking stitch on these 15sts.
Next row: k2tog, k5, CO 1 stitch, k5, k2tog.
Next row: P4, p2tog, turn leaving rem sts unworked.
Next row: k2tog, k1, k2tog.
Next row: Purl
Cast off

Rejoin yarn to rem sts and complete to match first side.
Make another piece the same.
Sew the two pieces together. Leave a small hole to stuff, then sew up the rem hole.

Lots of love!

Monday, 23 September 2013

Granny square SOS


This month, Inside Crochet has a distinctly granny theme, with a good proportion of the patterns inspired by the humble granny square. In honour of that, I thought I would share my tutorial for repairing granny squares. We have all done it - chopped off our ends at the centre of our granny square, thinking that we have probably worked over the end enough to trap it in. Then, some months later, you notice that the square is unravelling from the centre out. As with the blanket I had assembled for my nephew Austin at my sister's baby shower, which I talked about in my last post.


Above you can see the square that became unravelled in Austin's blanket. The good thing about this granny, and traditional granny motifs, is that they are usually made of a different colour each round so you can easily see distinct rows and it makes it easier to repair. It also means that if you cannot salvage enough of that first round of yarn to make the same round again, you can simply substitute another yarn in a different shade and it will not look out of place.


To begin, run a 'life line' along the round above the broken round; the round the unravelled yarn runs through. You can do this by threading a yarn needle and passing it through the round, or by pulling a thread through each group of stitches with a small crochet hook, as I am doing above.
If you are a fan of lace knitting, you may be familiar with a lifeline - a thread used to 'save' or mark a number of stitches -  but it isn't often used in crochet, as you usually only have one stitch on your hook at one time. A lifeline is run through stitches to allow you to pull back to that point without dropping stitches. The yarn or thread you use for this should be finer than the yarn used in the project, for ease of passing through and to limit stitch distortion. It should also be smooth, so you can pull it out easily when it is no longer needed. Finally, it should also be a contrasting colour so that you can see it easily. Therefore, any kind of strong, fine, cotton crochet thread is perfect for a lifeline, I am using a DMC Petra thread for the lifeline shown.
Once your lifeline is in place, you can safely unravel the broken round without fear of the entire motif disintegrating.

Now, starting at the treble group to the right of a set of two corner trebles groups, thread the working yarn you will be using to recreate the first round clockwise around the stitches of the round that the lifeline is holding. Pull a little through to work the first stitches, but make sure that you are working the first stitches with the shorter end of the thread and that the long/ball end is at the end of the round. (Note: I have only threaded the bright orange yarn of that first round left to right through the first corner treble groups worked to pinpoint the groups you should be working with first).


With the short end of yarn, begin the first round again, as for a regular granny square, making the ring, then working the first three treble group into the ring. Pull up on the last loop on your hook, making it longer, then remove your hook from the loop.


Insert the hook through all the stitches of the next two three treble groups at the corner, from left to right, then insert your hook back through the original loop from the first round, and pull that loop back through the two three trebles groups. You may need to now pull on the yarn to make that loop the correct size - it shouldn't be too big.

Work a three treble group into the ring of the first round, then pull up on the final loop, remove the hook from the loop and repeat the same process for each corner. As with a regular granny square round, join with a slip stitch to the first stitch and your repair should be complete! This technique was revolutionary to me when I first learned it, I hope you enjoy it too.


I am aware that this technique can be very confusing and fiddly to work so I am preparing a video tutorial - will post it ASAP! 

Monday, 1 April 2013

Free Easter Pattern


Happy Easter to one and all! This is a little late, but I have decided to re-post an old pattern of mine that I use in special Easter classes. File it away for next year, or decorate with different face as the perfect project to teach you kids how to knit - and a very happy Easter bank holiday Monday to you all.

Claire xEgg Cosy Pattern copywrite Claire Montgomerie 2010

Materials
Any scraps of dk weight yarn, 4mm needles, darning needle, felt and buttons for decoration

Simple Cosy Pattern, ideal for beginners

With 4mm needles, cast on 30 sts and knit every row for 6 cm, knitting in stripes if you wish.
Cut off yarn, leaving enough to sew up seam. Thread through all stitches and pull up into a round. Sew up seam and fasten off yarn.

Stocking stitch pattern

With 4mm needles, cast on 30 sts and knit every row for 4 rows. Change to stocking stitch and work for four cm, ending with a p row. You can knit in stripes of four rows of each colour if you wish.
Next row: (k3, k2tog) 6 times (24 sts)
Next row: purl
Next row: (k2, k2tog) 6 times (18sts)
Next row: purl
Next row: (k1, k2tog)6 times (12 sts)
Next row: purl
Cut off yarn, leaving enough to sew up seam. Thread through all stitches and pull up into a round. Sew up seam and fasten off yarn.
Use buttons or googly eyes for eyes and felt shapes for beaks. Use oddments of yarn for hair, faces, eyelashes.

Rabbit ears
(These are worked in garter st, but you could do them in stocking st, or in a mixture of stitches.
With 4mm needles, cast on 7sts.
Work two rows garter st, inc one stitch at either end of next row, then work a further 3 rows garter st. (9sts)
Dec one stitch at either end of next row, then work further 3 rows garter st (7sts)
Dec one stitch at either end of next row, then knit one further row (5sts)
Dec one stitch at either end of next row. (3sts)
Next row, sl 1, k2tog, psso. fasten off final stitch.
Make two the same. (you could also make two more ear shapes in a contrast colour and attach them to the inside of the main shade ear shape) and attach to the top of the cosy.


NB. Please feel free to use this pattern to make your own cosies but please do not reprint or resell this pattern on. Copywrite Claire Montgomerie 2013.

Saturday, 13 March 2010

fabric corsage tutorial


This pattern is very simple and yet very effective. You do not need to have any previous sewing experience as all the sewing happens at the back of the corsage and so is hidden away. It also takes no time at all to make -  it is unfussy, easy and quick.

Materials
A variety of fabric circles as wide in diameter as you want the corsage to be. The one I am working on here is 6cm in diameter. You will need at least 10 circles, but you can add as many as you need to make the corsage as full as you like.
Scissors or plinking shears, dependant on the edge you want to achieve
Sewing needle and thread
Safety pin or kilt pin, or hair slide, dependant on whether you want a brooch or hairclip


Step one
Cut out the circles, using a template to ensure each is the same size


Step two

Fold each circle in half and sew it to secure

Step three
Attach each folded semi circle together along the fold using simple tacking stitches and keep adding circles until the corsage is as full as you desire


Step four
Attach a safety pin, kilt pin, brooch back or hairclip to the back of corsage. 


Et voila!